RESIN FIGURES
Many of us are passionate about resin figures, these small sculptures that are works of art to be exhibited at home and inspire us.
In this complete guide we will explain everything about these figures, you will see fascinating artwork, and we will talk about the types of materials, how to paint, assemble and even make your own resin sculptures.
If you are going to start painting these pieces and even make them yourself, read below on this subject and you will save many hours of your time in researching all the necessary information and, with the tips we give you, you will also avoid the common mistakes that are made at the beginning.
You will be amazed by these modern resin figures, handmade and hand-painted by the artist.

TABLE OF CONTENTS:
ART IN RESIN FIGURES
Sculpture is as old as mankind itself, art has been with us since the beginning of time.
Since the statues in materials such as clay, stone or wood, we have seen how over time new options have been incorporated, which with the same or even greater artistic possibilities, have more functional advantages to create figures. This is the case of resin.
What is resin:
It is a synthetic material with many applications, from industrial to artistic and decorative (in this article we will not refer to the natural vegetable resin that we see, for example, in trees). It is light, resistant and durable.
There are different types and compositions, as for example, the polyester, very used, of a transparent color similar to the epoxy. Each one has its own characteristics, and will be more or less suitable depending on the type of resin figurine we want to make, later we will explain many things about the different types of resin, some with surprising “properties”.
Resin is very popular in the creation of sculptures, jewelry, collectible figurines, decorative figurines, etc. It provides better finishes than other types of materials, making it especially valuable for collectors.
Used in figures, it is harder than PVC and therefore heavier.
Synthetic resin requires more care and labor to make a figure than PVC, so it is less easy to work with.
It allows a process when creating the pieces that minimizes imperfections, for example, the possibility of air bubbles. This is generally avoided in resin figures for artistic purposes.
It requires less care than in the case of PVC or vinyl, however, although it is more resistant, we must be careful with shocks and sudden changes in temperature in our sculptures, as it is not an indestructible material.
Its modern application in figures:
In the case of outdoor statues, it is necessary to protect them from climates with many changes, such as when there is frost at night and during the day temperatures are much higher.
For the creation of resin sculptures, molds made of silicone, rubber or other flexible material are usually used, although some people also use other materials such as metal or plaster.
However, these materials for a mold are not the most practical, taking into account that the positive, i.e. the figure inside, must be removed.
In addition to molds made of soft materials, layers of polyvinyl alcohol or talcum powder are used to prevent the figures from sticking when they are removed.
The resin figures can be painted and/or enameled imitating other materials such as bronze, marble, ceramic, stone etc. It admits several coats of paint, although the ideal is that at the beginning it has a first coat of primer that makes the next coat of paint to be fixed correctly. The priming of the sculpture to be painted is fundamental, you will see later why.

Blue Gus
Resin figure of the aviator Gus hand painted in blue tones.

Transmovimiento
Ornamental mask for wall, handmade and hand-painted.

Faun of the forest
Connect with the magic of the forest in your own home. Hand painted.
RESIN FIGURES TO PAINT
Often what we are looking for is to paint our sculptures ourselves.
It is a very rewarding process, but one that should not be taken lightly, it requires some planning, choosing the piece, materials, colors.
There is a lot of growing interest in this type of hobby and in decorating our space with a piece decorated to our taste.
Maybe in your case you are a fan of crafts and painting on “white” works, either to use them later to decorate a particular place and therefore you want certain colors, or to give a resin figure to someone else, decorating it to your liking.
In the following section you will find a complete tutorial with all the necessary tips to paint them.

HOW TO PAINT A RESIN FIGURE
If you want to know how to paint a resin sculpture, we will clarify the doubts that usually arise at the beginning and we will help you to start in the right way, you will avoid the most frequent mistakes at the beginning and you will save time and “displeasure”.
If you are going to paint other figures that you have bought in pieces or a repaired figure, read below the explanations on how to paste resin figures in order to prepare them before painting.
Initial tips before painting:
Protect the surface on which you will place the figure with a suitable paper and try to be in an environment with sufficient ventilation (if you use aerosols, take special care with these protections).
To hold the figure: Use elements that you can recycle from home to hold and move it without touching it. Empty cans, cardboard boxes, cork stoppers, etc. will be useful.
Now for a tip on how to paint your sculpture that many overlook and has nothing to do with painting: light.
Before you start, you need to have your piece well lit, natural light is perfect, however, in many places it will only come from one angle.
It will be highly recommended to complement any lack of light you have with lamps, not only on different sides but also at different heights, and that are of white light which is the one that will reflect your colors in a more neutral and objective way.

The primer:
It is important to apply a first coat of primer, which is often a white liquid that serves as a “base” for subsequent coats of paint.
The primer allows greater visibility of the colors of the paint that will go over it and also makes the paint adhere better to the sculpture.
Regarding the color of this one, our suggestion is that at the beginning you try with white, which is the one that will have the least influence on the colors you are going to use later, the shades with color and black will condition more the final result. It all depends on the effect you are looking for, of course.
Watch the amount you use! It must be a porous and irregular layer for the paint to adhere, if it remains smooth it means that we have applied too much. The ideal is to use an airbrush, in case you don’t have one, there are brands that sell spray cans.
We advise you a couple of options which are: Tamiyao spray surface primer of the Games Workshop brand. Vallejo is not bad either.

Painting materials:
Brushes:
If you are going to use synthetic bristle brushes, it is recommended that they are cheaper and softer than natural bristle brushes. And they allow a better application of the color layer. It is important that you use the appropriate thickness for the area of the figure you want to paint.
For small details that consist only of a “touch” of color, some people use a toothpick. However, for small details (such as the eyes, or tiny ornaments) buying brushes number 1 or 2 would be enough. There are even brushes for painting miniatures, with a very very fine tip, but you should not need them unless you want to paint/draw very small details.
A highly recommended brand is Winsor and Newton. Escoda or Van Gogh are not bad and can sometimes be cheaper, but if you can afford it, use W & N.
You can also use natural hair brushes, we recommend sable brushes. They can be more expensive, but the result is also very good.
Since this painting decorative figures will be addictive if you are just starting, we recommend you to take care of the brushes by washing them properly after each use, they can last for a long time. Brushes should not only be washed after the whole painting process, but also between each mixing.
For this it is advisable to use several glasses of water, so you will avoid that, when using different paints, residues of one pass to the brush when using the other (for example after using a metallic glossy paint to another matte). The reason for using glasses and not an opaque can is because, being transparent, you will notice if the water is too saturated.
Palette:
For the paint mixtures you can use a “homemade” surface made with baking paper sold in stores, placed on a damp cloth or cloth, so you will avoid that the paint dries “prematurely” as sometimes happens with a normal palette (we started to paint, we received a phone call … and the “magic mixture” that cost us so much to get hardened). Also, as long as the surface is not porous and is easy to scrub, you can use as a palette ,for example, plastic plates or things like that.
Aerosol:
Of course, you can also spray paint the figures, especially if the surfaces to be covered are large. Remember to take care of the ventilation and to protect yourself. There are several brands that sell the paint can to be sprayed on the piece.
You can also consider the option of using an airbrush, which will always be more precise and adaptable to the areas of the sculpture to be painted.
Types and brands of paint for resin figures:
Acrylic paint is ideal for use on this material, it adapts to different surfaces of varying porosity. The matte version usually gives very nice results.
We are going to choose some of the best brands to paint a resin sculpture, according to our experience, so that you don’t have to search too much, and you will be able to decide between them.
Games Workshop proporcionan un acabado más plástico, que para resaltar colores intensos puede ser la adecuada. Es muy empleada para resultado de metálicos.
Andrea has certain shades already prepared, and you won’t have to mix and match.
Citadel is quite good and has very original shades.
Vallejo is one of the best known and recommended. It is characterized by having a more matte tone than most.
If you don’t have a lot of time to spend researching and testing among the universe of brands out there. With these four you can already find your favorite brand of paint; or favorites, as you will see that in the end it is usual to alternate them according to the necessary purpose.

How to apply paint on sculpture:
It is usual to use several coats, being the first ones on the larger areas and the successive ones to treat the details. Fundamental: when painting over a previous coat, wait until it is completely dry before applying the next one, following the times indicated by the manufacturer and taking into account the humidity of the environment of the area where we are.
Besides keeping in mind the size of the areas to be painted, it is important to plan the order of the colors, depending on the final result we want. That is to say, first we will go better with a white primer, gray, black, etc., then we will order the layers of paint for the base, then the details, and we will have to take into account if the colors are light or dark.
For example: when we want to use metallic paints it can look better if we first give it a coat of gray paint.
Apart from alternating coats we can alternate different brands of paint, as some are more matte and others more glossy.
Another example: it will not be the same to look for a stone effect, than to paint what would be the character’s skin, or elements that require a brighter result (e.g. a belt with its buckle).
Once we have finished painting and drying we can apply different types of varnishes or lacquers to achieve the desired finish. The varnish can be an indispensable finish, for example, in the eyes of our character.
We can also give texture and relief to our sculpture, for this there are various materials such as sandstone paste, which provide a special roughness to the surface.


Buy resin figurines to give as gifts
At Arteologic the pieces are handmade in high quality professional resin. The sculptures are finished and prepared without edges or “cut-out areas”. There are also no traces of lubricants used in the molding process.
Once ready, they are also hand painted and decorated, each figure is unique.
The characters they represent are based on mythology and archetypes capable of inspiring us and transmitting positive elements.
They can be a wonderful gift for decorative purposes or for anyone who likes fantasy, fables, creatures in nature and other elements of a world from which we are unfortunately increasingly disconnected.
Each sculpture comes with a certificate of authenticity issued by the author himself.
Take a look at the works shown in the gallery, and choose the one that inspires you.


Finishes of the Marivuk wall figurine series
RESIN FIGURES FOR DECORATION
Resin figures are an excellent alternative to stone figures.
Also, if they are to be hung on the wall, depending on the size, hanging a stone work of considerable weight may not be a very good idea if it is not done correctly.
There are stone effect finishes that show a very similar result.
There are also shades that simulate metals, for example, patinas similar to bronze, or finishes emulating rust.
Resin pieces have the advantage of lightness. However, they are not as resistant to temperatures below zero, as well as to sudden changes as a work made of stone. Thus, although they have different metal and stone imitation finishes similar to iron, marble, granite, brass, etc., they will not be as suitable for outdoor use as these materials.
However, to decorate interiors they are an excellent option.
You can give a rustic touch to a room by placing a figure painted with rust effect. Combine colors in a more modern way according to the walls, using contrasts. And you always have the option of acquiring the work unpainted and painting it in the most appropriate color according to the decoration of your home. Remember that lighting is key, as much or more than in the case of a painting, here we are talking about works that are occupy a volume and generate plays of light and shadows that can give more power to our sculpture. In the case of interiors, if we have directional spotlight panels that are sold for ceilings, it will give us many possibilities.
There is a curious phenomenon to take into account when choosing a place and it is that “it is the work that sometimes chooses its place”, we already talked about it in our article on wall figures. It happens that sometimes we have the previous idea of putting the work in a place and, once there, “it asks for another one”, in which once placed, we see that it fits perfectly.
In any case, the variety of sizes, styles, motifs, colors, finishes, etc. that you can find ensures that you find the perfect element that inspires you decoratively.
HOW TO GLUE RESIN FIGURES
Sometimes figures are purchased in pieces in order to be assembled, which lowers their production costs, especially when they are manufactured in a more industrial way.
Other times, although this material is quite resistant, it may happen that a part of our sculpture has broken and needs to be repaired.
For this we will need a cutter or a modeling knife, pliers, sandpaper with the necessary abrasiveness for our figure, or modeling sandpaper. Also green putty to fix defects.
The pieces to be glued must fit or connect perfectly together for aesthetic reasons, so sometimes it will help to make some kind of mark that we can then hide, both on the surfaces to be joined and on the edges to have clearly identified the exact places where to join.
You can use some glue suitable for the resin, which will probably take acetone, which does is to melt the plastic material of which the resins are composed and when solidified will be perfectly soldered. A glue of this type, depending on the brand, can take around 5 minutes to glue, so you have to keep the pieces together either manually or help us with some invention, such as holding them together with tweezers.
Now, the best glue for resin is epoxy. It is a two-component glue that acquires a great hardness when mixed. You can find it in various brands and sizes. In DIY stores or in bazaars. One of the most famous brands in Spain is Araldite. This glue has the disadvantage of viscosity and drying time (it takes from 5 or 10 minutes to several hours depending on the product), so it is the best option for gluing large pieces, or “serious” breaks.
For details or for more delicate parts, cyanoacrylate is the right glue. Liquid instant glue. It is very fluid and glues in seconds. But it is important that the surfaces are very clean and free of dust. And it is better if you sand them a little with fine sandpaper before gluing.
A key tip in the case of large and relatively heavy pieces is also to join them on the inside with some wire (we can recycle a paper clip if the thickness turns out to be adequate and thus avoid buying a roll of wire).
To do this we use a drill bit of the appropriate size for the thickness of the wire we are going to use and, using a modeling drill, we drill both parts to the appropriate depth.
Then we calculate the length of the wire to be inserted, cut it, apply the glue or joining element, put the wire in one piece, apply the glue in the other and join both pieces pressing and keeping them together until they are completely dry.
RESIN ART
Sculptural art until a few decades ago was associated with working with materials such as marble, bronze, wood, etc.
Today, thanks to the discovery of new materials and their application of what were initially industrial materials to the artistic world, we can use elements such as professional plasticine, which are easier to work with and allow us to make molds with which we would obtain the famous resin figures.
The fact that a material is easier to “tame” and model is not incompatible with the quality of the final artistic result, more and more and with the support of the film industry have been appearing artists of great renown, as sculptors of first line. The new materials have the advantage of being accessible to anyone who wants to start sculpting, it is no longer necessary to bring a block of granite of several tons at home and start sculpting.
There are four types of resin, which we will talk about later, some of which are quite different from each other and have some surprising characteristics.
Resin art has been taking different forms, from producing objects resulting from the casting of a mold, to mixing with elements such as wood or metal.
Many techniques allow very beautiful works but that cannot be considered sculptures since they are decorative pieces whose attraction is the ability of this material to solidify taking different transparent forms, such as the works that we can see in pieces of costume jewelry, made in epoxy resin, plates to hang imitating the sea, tables or other beautiful creations that are applied in the decoration of homes.
Resin art takes many forms depending on the technique used, the purpose we pursue, etc., it would be similar to talk about “ceramic art” that occupies a beautiful range of different options, from decorative tiles or household objects such as vases, to what would be properly ceramic sculpture.

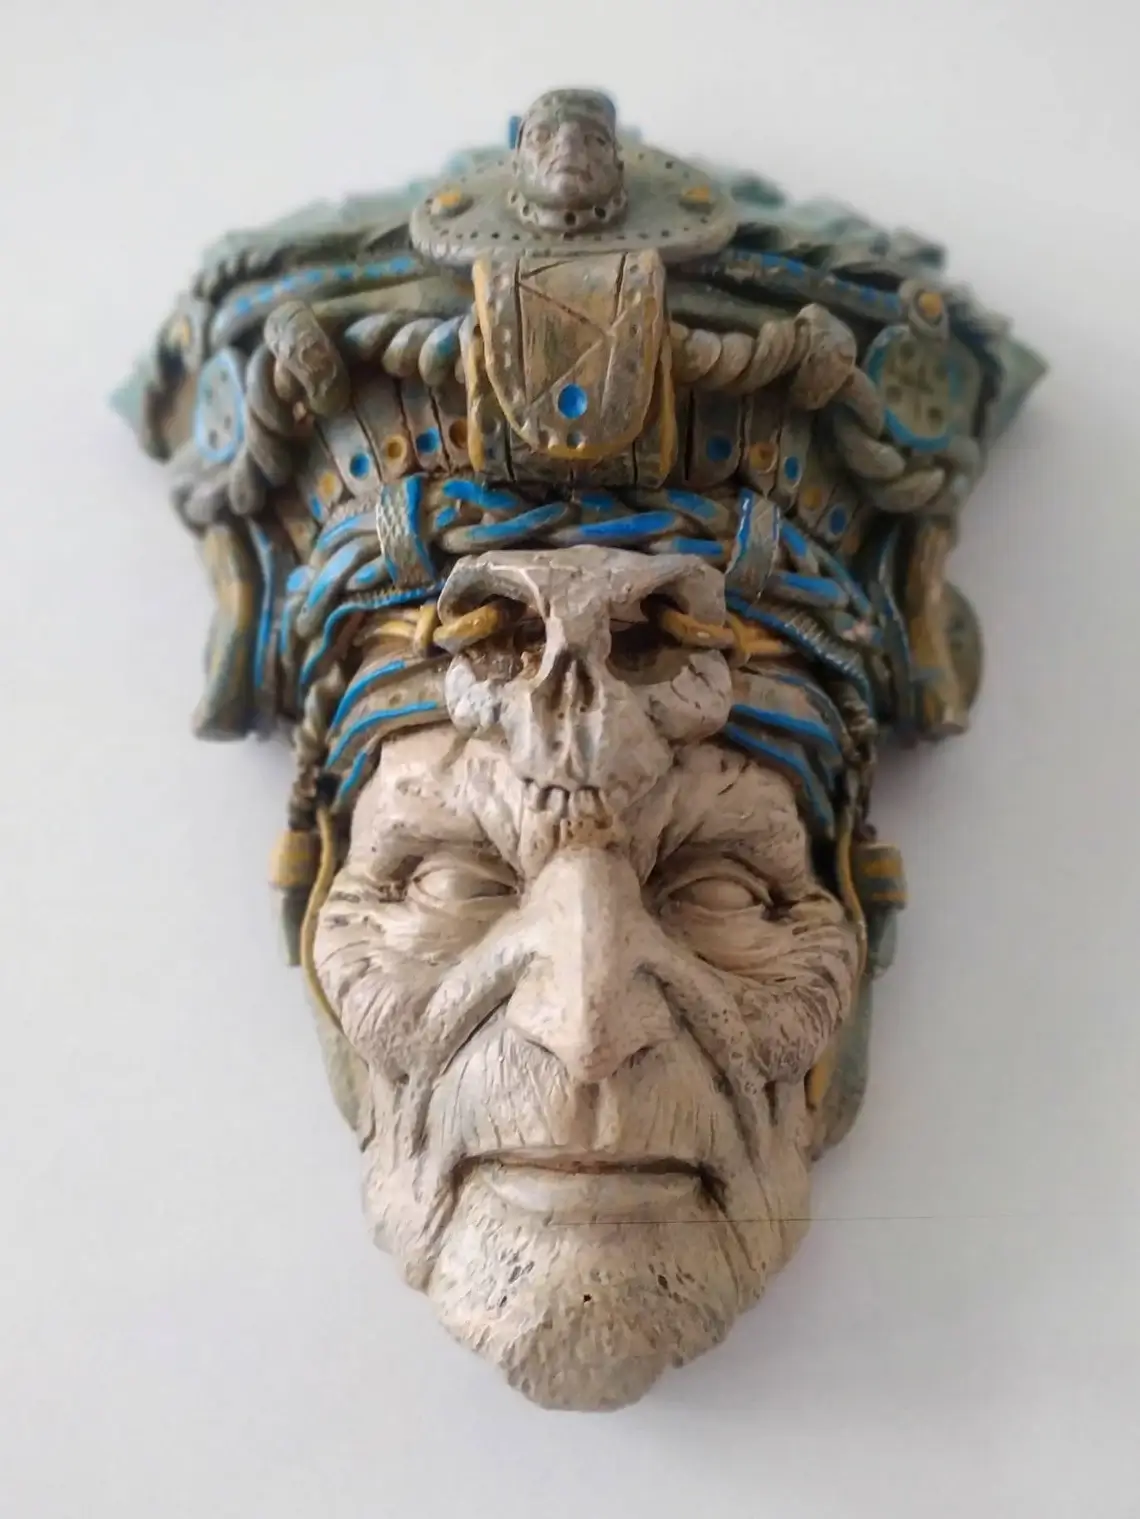
Patinated faun mask
HOW RESIN FIGURES ARE MADE
Resin figures can be made in basically two ways: Either in a direct way or in an indirect way.
In a direct way we will use epoxy modeling putty to make our figure. Depending on the complexity and size we may need to build a frame first, on which to start modeling, so that the figure has enough strength and stability. Normally a metal frame is built with wire and volume is added with aluminum foil to generate an approximate shape of what will be our figure. On this frame we will add the epoxy putty covering it completely, and we will add details and textures until our figure is finished.
The epoxy putty has a specific working time, depending on the manufacturer, and once it has solidified it can be sanded and reground. Once it has been re-shaped you can add more putty without any problem. It is a very versatile technique and it is a very entertaining process to make unique resin figures that you can then paint and keep, as it is a very resistant material.
The other way to make our resin figures is indirectly, that is, by filling a mold.
There are many types of molds, of many types of figures, and as long as they are made of silicone they will be perfect to reproduce our resin figures. We can acquire many types of molds with many designs browsing the web, or we can use a mold that we have made ourselves.
To fill a silicone mold with resin we will use liquid resin. The one we like the most.
The most common is to use polyurethane or acrylic resin if it is going to be a figure that we are going to paint, or transparent epoxy resin if you want to get translucent effects by partially dyeing it or mixing it with other elements such as glitter, plastic beads or any other small decorative element you can think of. There are many possibilities.
In order that our resin figure comes out with the highest possible quality, the ideal is to be neat in the procedures. The mold must be completely clean and dry. And we must follow the following steps:
Apply release agent to facilitate the removal of the figure and to extend the useful life of the mold. The molds deteriorate with use, and the release agent extends its life. It is not essential to use release agent. Although it is highly recommended.
If the figure has many details, pour a little resin into the mold and distribute it well in all the corners with a small brush, a toothpick, or by turning the mold over. The objective is that it reaches all the corners to copy all the details.
TYPES OF RESIN FOR SCULPTURE
Comparative guide
When searching the Internet for information on resins, we are usually overwhelmed by the amount of technical information available.
It is possible that we are looking for information about resin for sculptures or resin for figures without even knowing very well what we intend to find, since the field of resin sculpture is very wide.
For the use of resin as a sculptural material, or rather as a material for a sculpture workshop, the first thing we need to be clear about is some very basic knowledge.
As this article is focused on a general audience, and not specifically on the chemical or industrial sector, we will not delve into aspects such as the chemical composition or the differences in molecular stability of each of the resins, but on the contrary, we will use a more simplified language for a better understanding.
The resins used for sculpture are synthetic resins. And only a few types. The most basic thing to know about synthetic resin is that it is an artificial polymer. A “plastic”.
The 4 most common types of resin used in the sculpting field are: Polyester resin, polyurethane resin, epoxy resin, and acrylic resin.
All these resins have mainly industrial applications, but we will confine ourselves in this article to the purely sculptural field.
Each of these resins has specific characteristics and applications compared to the others. The characteristic they have in common is that:
All these resins consist of two components, the base and the catalyst, which when mixed in the right proportion react chemically, resulting in a rigid, resistant, easy to machine and paint material, giving rise to a very versatile material within our sculpture workshop.
Next, we will go into some depth on the main specific characteristics and differential singularities of each one of them:
For reasons of seniority, we feel obliged to analyze polyester resin first:

Forest faun mask
Polyester resin
It was possibly the first resin to gain a fixed place on the shelves of the sculpture workshops, always accompanied by its faithful and inseparable companion of fatigues, fiberglass.
This combination of materials that we will now talk about was the first plastic material that somehow positioned itself next to the traditional definitive sculptural materials such as terracotta or plaster. At least in large sculptures.
It also became indispensable for the creation of shells or madreforms in the creation of silicone molds, and is even used (albeit with limitations) as a material for rigid molds.
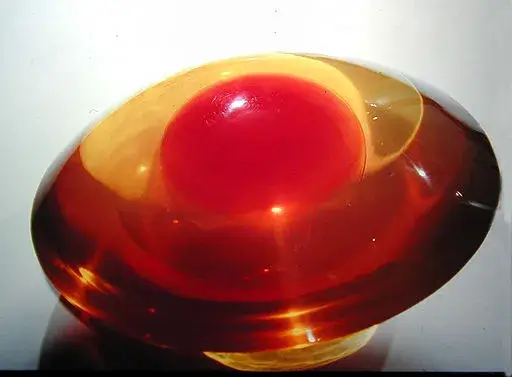
Polyester resin is usually presented in the form of a viscous liquid fluid with a honey-like consistency. It has a fairly transparent color although with yellow or pinkish reflections.
Its catalyst is Methyl Ethyl Ketone Peroxide or MEC Peroxide which is a very fluid liquid completely transparent.
It is mixed according to the manufacturer’s proportions in a very specific proportion that requires a weight or precision scale to mix properly, and the margin of maneuver that it allows us if we do not mix well is quite small.
WARNING: It is very important to measure the quantities well because we may be surprised if the mixture does not catalyze and remains in a rubbery and sticky consistency or, on the contrary, catalyzes too fast and can even be quite dangerous.
An excess of catalyst in a very large volume of resin, if it is also exposed to a high temperature (e.g. in summer) can lead to a rather violent chemical reaction.
The reaction of these two components is exothermic (gives off heat) and the mixture can reach very high temperatures with the risk of causing burns if touched without protection and can even explode and partially or totally break apart.
Polyester resin has a very strong and characteristic odor and it is therefore essential to use specific respiratory protection equipment for handling toxic products.
After getting so technical, we will evaluate the advantages and disadvantages, the pros and cons and the most common applications in the sculpture workshop.
It is a fairly inexpensive material. It is probably the cheapest of the resins. This is one of the reasons why it is so widely used.
When it comes to working it is the ideal material to laminate with fiberglass creating very thin but very resistant surfaces with the advantages that this has in terms of weight and impact resistance for example. It is ideal because it is very fluid and therefore adapts perfectly to the surface on which it is being applied, filling all the corners and thus generating a final surface (if properly applied) completely homogeneous, free of bubbles and in which even the smallest detail has been copied.
It also has the advantage that it can be “loaded” with a filler. It can be mixed with other materials to achieve other finishes. For example with bronze or marble powder, among many others. This being the basis of the procedure for the realization of artificial stone sculptures, for example.
The main drawback is toxicity.
As we have already mentioned, specific protective equipment is required, as well as working in a well ventilated area, etc., so it is not so easy to use at home.
Another drawback, although already mentioned, is the odor. The smell of polyester is very strong and very long lasting. If you make polyester inside a room that is not ventilated, such as a room in a house, the smell can remain there for several days and is quite uncomfortable. Saving the distances it is like the smell of the gasoline, or of the silicone of bathroom, a powerful and penetrating smell, but in this case it is even more intense. Be careful with that.
On the other hand, we also have the issue of casting (which is the pouring of the material into the mold). It is not possible to cast large quantities just because of the exothermic reaction explained above. In fact, this is so much so that special polyester resins are marketed, specifically for casting several centimeters thick. It is therefore not suitable for filling a medium-sized mold in a single casting. This is a disadvantage compared to other resins.
Polyurethane resin
Polyurethane resin is the most popular resin nowadays in the world of reproduction of small size figurines. Practically all the small figurines you can buy in the market are made of polyurethane resin. In souvenir stores in museums, fridge magnets, etc.
This resin is usually marketed in liquid form and consists of two components. A and B. One is the polyol and the other the isocyanate. One is the base and the other the catalyst. The components have a semi-transparent color with orange tones in the liquid state and when catalyzed, the final hardened mixture has a light yellow color.
This resin has many advantages:
It mixes very easily. Generally (although there are exceptions) the mixing ratio is 1:1, i.e. the same amount of base as catalyst. And with a household scale it can be accurately measured very easily.
Another advantage is its viscosity. It is a very fluid resin, which allows it to reach all the corners of the mold and copy all the details perfectly. Moreover, because it is so fluid, if it is carefully poured over the mold it does not leave any bubbles and the reproductions are perfect.

Sculpture “Gomathi” in polyurethane resin, hand painted.
The curing time is also a great advantage. While polyester resin or epoxy resin takes hours to set, this one takes minutes. This is one of the key reasons why it is so widely used worldwide.
The disadvantage is the price. It is much more expensive than polyester.
It is the ideal resin for use in one-piece molds that you want to fill by casting.
Another advantage of polyurethane resin is that once solidified, it can be machined very easily. It can be sanded and easily prepared for painting.
Epoxy resin
Here we are not going to extend much more because this resin has many similarities with the polyester resin. We could say that it is its sister.
It applies the same, behaves the same, has the same resistance, etc., there are only two fundamental differences.
It does not smell, or rather, it smells significantly less than polyester resin (we do not say that it is not toxic, you have to wear a filter mask anyway). It is more expensive just for that reason.

Sculpture “Ice Princess” in acrylic resin, hand painted.
Acrylic resin
Acrylic resin has been on the market for the shortest time, and has been a breakthrough in the sculpture workshop. It is becoming increasingly popular among sculptors for several very important reasons.
It is very easy to use. It usually comes in powder + liquid format or just powder (to be mixed with water). It is easily mixed following the manufacturer’s proportions, always adding the powder to the liquid. It usually comes in white color and can be tinted like all resins.
It allows a longer working time than polyurethane resin, i.e., you can make more without fear that it will catalyze in the pot before filling the molds of the figures. Although it is a fairly short time. It depends on the manufacturer, but in about 30 minutes we could take the piece out of the mold.
It can also be applied by brush and mixed with fiberglass to make large sculptures and/or mold housings.
The surface finish is very fine.
It is resistant and easy to sand once dry. It is somewhat porous, so it can be painted directly.
And most importantly. It is non-toxic. It does not smell and is environmentally friendly and the utensils can be easily washed with water. It is ideal for working at home.
However, it is not the cheapest of all, although lately due to the high acceptance and use in the sector, prices have dropped and there are some brands with very competitive prices.
Well, up to this point we have made a complete tour of the wonders of resin figures, which are sculptural art using the new current materials.
We have talked about this material in general, we have shown you part of our gallery, we have explained the whole painting process, the types of resin, etc.
We hope to have clarified doubts and, for those who did not know this type of sculpture, to have discovered a world that we trust will be as fascinating as it is for us.
Here are some frequently asked questions answered as a summary:
What types of resin are there?
The four most common types of resin used to make figures are: Polyester resin, polyurethane resin, epoxy resin, and acrylic resin. The first one was the oldest. Acrylic is the most widely used and has more advantages than most.
How to make resin figures?
Resin figures can be made in two ways: Directly (by creating the figure from scratch, for example, on a frame and using epoxy) or indirectly, which is by filling a mold.
How are resin figures painted?
First tip: Choose the right materials for your project.
Sometimes a first coat of “primer” may be necessary.
Then, planning the order of the following coats, the colors and what to apply them with is key, also keep in mind the drying times.
Lighting is important for a good finish.
In the guide you have all the necessary information and tips.
How are the figures glued?
To glue a broken work or a work to be assembled, the surfaces to be joined must first be prepared, so that they fit perfectly.
Then you can use, for example, an epoxy glue, or cyanoacrylate for details.
If they are large pieces you can use wires to hold them better.
Consult the guide for the most appropriate way according to the case.
For the writing of this article we have been fortunate to have the sculptor Javier Romero Abrio.
Graduated in Fine Arts specializing in Sculpture in 2009 from the University of Seville, during the last 10 years he has worked in many different formats, materials and techniques.
Javier, a lover of technical procedures and multidisciplinarity, is the author of the magnificent works shown in the images.
WRITE US
Consult whatever you need.
We will be happy to help you with your questions or listen to your ideas.
(Except to respond to your inquiry, we will NOT use your email address for marketing communications.)
You can also write us by Whatsapp:
It’s hard to find experienced people in this particular topic, however, you sound like you know what you’re talking about! Thanks
Great that you liked the article!
Thanks to you for your comment.